A Tutorial for Creating Three Dimensional Face Mesh
created by
Teemu Pekkanen
2005-2008
|
|
Purpose of this Tutorial is to demonstrate different kinds of methods to create a three dimensional face mesh. In this tutorial there will be demonstrated a real persons face meshing and mentioned use of a clay model for the same purpose. Further will be dealt with suitability of different techniques for different purposes.There examined problems and good sides of different techniques. Further there are dealt with suitability of different techniques for different purposes and look for possible faults and problems.
DescriptionDevolpement of the idea to realisation was a long process. The idea came to me when I was pondering a technic that would help to fit an oblique texture to three dimensional object as if it would be a paraller texture. The idea went worth with a technique which would help to measure the volume of a room or space by using photogrammetry. These techniques cannot be said to be anything new. Photogrammetry has been in use for decades for making maps. It is about introducing these techniques for hobbyists of three dimensional modelling. In the first phase of project there was made a crude mesh of a human face by using make-up pens and taking photos from the side and the front. For having three dimensional mesh with X, Y and Z coordinates,it requires at least two images. A whole face can be made by mirroring the half part, pressuming that the face is symmetrical. Markings that are made with using make-up pen helps to combine depth coordinates with height and length coordinates. This way modelling of a face is much faster and distinct. These coordinates can also be used for determining face animations.
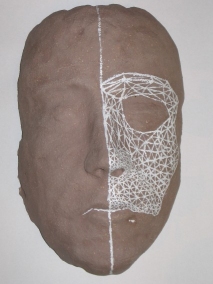
This technique has its limitations for high details. It is not suitable for making very accurate meshes, because make-up might tarnish and it takes time to draw them. It is possible to have more details with a traditional clay model, but it takes lots of time and there are limitations for drawing the polygons too.
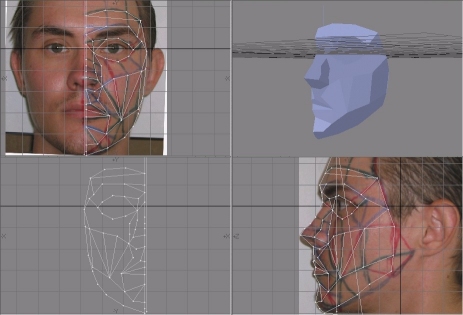
When determining the suitability of a technique, it is good to consider following aspects: time, expences and easiness. A good modelling technique that fits the requirements is the light projection. Projection technique is cheap, fast and easy to use for creating a "reference" mesh, that is used for creating three dimensional shape. The projection can be either done with a overhead- or computer projector. In addition to a projector, there are needed two or three cameras for genuine three dimensional face mesh. With two cameras another side of the face is mirrored. These cameras should be syncronized to take the image at the same time. It is vital to make sure that photo is taken directly from the side and from the front.
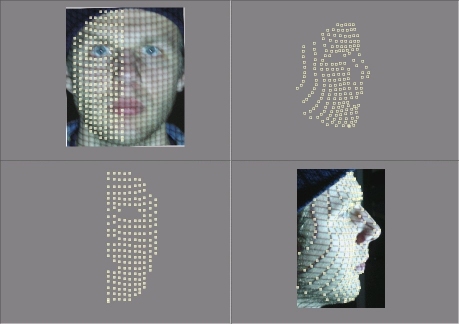
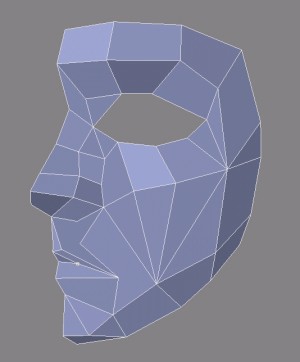
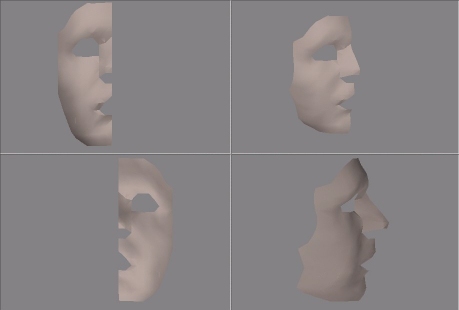
The example images have been taken as unsynchronized. This lowers the accuracy but is suitable for a rough version. Then the editor has to take unsynchronization into consideration and estimate the difference. After creation of a mesh the crossing points are easy to combine to each other into triangle or quad polygons. It is possible to set smoothness with modern programs, which makes even a rough mesh looking nice.
|